Align those Horizons
I originally posted this tip on another blog I started awhile ago and decided to re-post it here. I believe, this will be the first photo tip and/or trick I share here and hopefully far from the last.
This post will discuss aligning your horizons in your photographs. Beginner photographers miss this one the most, but even some that know what they are doing miss it from time to time.
Here is an example of a picture I took of a beautiful Hawaiian Sunset:

As you can see, the horizon is sloping down to the right.
It is important to mention that if the horizon is meant to be tilted because you (the photographer) intends for the picture to be tilted, that is absolutely acceptable and at the discretion of the photographer.
Here is an intentionally crooked photo I took of the entrance to the Legion of Honor in San Francisco:
However, if you did not intend to have a tilted photograph, it is time to learn to straighten those horizons.
First off, while taking the picture, try to ensure you are composing the picture exactly, or closely to, the way you want it. I am not going to go into depth about composition here as there are plenty of tutorials out there that cover just that. Double check the horizon, your main subject, and the surrounding subjects to ensure the alignment looks “correct.” When ready, fire away!
Ross, one of my photography partners, suggest using the Canon EF-D Focusing Grid for the 40D. This nifty little accessory fits right in your viewfinder and gives a nice grid to look through which doesn’t obstruct your focusing points. Not only does this accessory help line up your horizons it also reminds you to be conscious of making sure the horizon is straight.
If you don’t have or want to get the focusing grid, you could also just write yourself a reminder and tape it to your camera. The note could be as simple as, “Straight Horizons.” You could also add anything else you might want to ensure you check before shooting such as “White Balance” or “ISO.”
After the picture is taken and you are back at home reviewing your pictures in Adobe Photoshop or Adobe Lightroom, do the same thing. Check the horizon, your main subject, and the surroundings. Both Photoshop and Lightroom have a nifty tool to align the photo pretty easily so you don’t have to depend solely on your eye’s accuracy.
In Photoshop:
This tool is called the Ruler Tool. I’ve never understood why, but it is hidden under the Eyedropper Tool, as shown here:

Once the Ruler Tool is selected, find the object in your photograph you would like to “straighten” or align the photograph with. This can be any “line” (horizontal or vertical) within the photo that you believe is to be straight. With your mouse, click on the far side of the object and, while continuing to hold the mouse button down, drag across your photo to the other end of the object you are following and release the mouse button. At this point, you should have drawn a line on your photograph that should be exactly lined up with the “straight” object in your photograph.
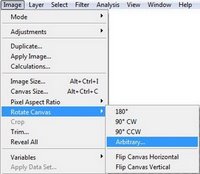
Now, under the Image menu, select Rotate Canvas | Arbitrary…

The angle and the direction (CW or CCW) should be already filled in and selected for you. Click OK and you should see your picture rotate. After you crop the sides appropriately, you should now have an image appropriately aligned and straightened.
In Lightroom:
The process in Lightroom is much more straight forward.
Select the photo you wish you straighten.
Switch over to Develop mode and select the Crop Overlay (R):
![]()
From here, you should now see the Straighten Tool Options:
![]()
If you select the Straighten Tool, the steps are very similar to Photoshop.
Find the object in your photograph you would like to “straighten” or align the photograph with. This can be any “line” (horizontal or vertical) within the photo that you believe is to be straight. With your mouse, click on the far side of the object and, while continuing to hold the mouse button down, drag across your photo to the other end of the object you are following and release the mouse button. The photo will automatically shift and align to the line you just drew.
Alternatively, you can use the slider to eyeball when the picture is straight. This can be extremely handy when there isn’t a particular object available to straighten the picture to.
That should do it. Here is the final picture:
Capturing straight horizons or fixing them so they are straight is easy, you just have to train yourself to watch for them. Once you start realizing it and fixing them, you should never have an unintentionally crooked photograph again.
Happy Shooting!
Till next time…


